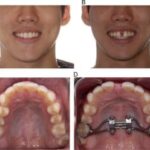
Having a palate expander is a common orthodontic treatment for individuals with a narrow upper jaw. This device helps widen the palate, creating more space for the teeth to align properly. However, the success of the treatment depends on regular adjustments and tightening of the expander. If you’re unsure about how to tighten your palate expander, this step-by-step guide will walk you through the process.
Step 1: Gather the necessary tools
Before you begin, make sure you have all the tools required for tightening your palate expander. These typically include a key or a special tool provided by your orthodontist. Keep the tool in a safe place, so you can easily access it whenever it’s time for an adjustment.
Step 2: Locate the expander
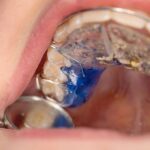
Using a mirror, locate the palate expander in your mouth. It is usually positioned in the roof of your mouth, towards the back. Take a moment to familiarize yourself with the device and how it works. This will help you feel more confident during the tightening process.
Step 3: Insert the key
Carefully insert the key or tool into the hole or slot located on the expander. Make sure it fits securely before proceeding to the next step.
Step 4: Turn the key
Step 5: Remove the key
After completing the tightening process, carefully remove the key from the expander. Double-check to ensure it is securely stored in a safe place for future adjustments.
Step 6: Rinse and clean
Finally, rinse your mouth with water to remove any debris or residue from the expander. Use a soft toothbrush to clean the device gently. Maintaining good oral hygiene is crucial during orthodontic treatment.
Remember, it is essential to follow your orthodontist’s instructions and schedule for tightening your palate expander. Regular adjustments will help achieve the desired results and ensure a successful treatment outcome. If you have any concerns or difficulties during the tightening process, don’t hesitate to reach out to your orthodontist for guidance.
Preparing for the Tightening
1. Schedule an Appointment
2. Gather the Necessary Tools
3. Wash Your Hands
Before handling your palate expander, it is crucial to wash your hands thoroughly with soap and warm water. This will help prevent the spread of germs and ensure a clean environment for the tightening process.
4. Find a Well-Lit Area
Choose a well-lit area in your home where you can comfortably perform the tightening procedure. Good lighting will help you see the expander and key clearly, ensuring that you are able to perform the process accurately.
5. Relax and Take Deep Breaths
By following these steps and properly preparing for the tightening process, you will be able to ensure that your palate expander is tightened correctly and effectively. Remember to always follow the guidance of your orthodontist or dentist, and if you have any questions or concerns, don’t hesitate to reach out to them for assistance.
Gathering the Necessary Tools
1. Key
The key is the main tool used to tighten the palate expander. It is a small, metal device that fits into the expander and allows you to turn it to activate the expansion. Make sure you have the correct key for your specific expander.
2. Mirror
A small mirror will be helpful in allowing you to see the expander and ensure that you are positioning the key correctly. It will also help you to check for any loose parts or issues with the expander.
3. Gloves
Wearing gloves during the tightening process is important for hygiene purposes. It will help to prevent the spread of bacteria and ensure that you are working with clean hands.
4. Disinfectant Solution
5. Cotton Swabs
Cotton swabs can be used to apply the disinfectant solution to the expander. They are also useful for cleaning hard-to-reach areas and removing any excess solution.
6. Towel or Napkin
Having a towel or napkin on hand will allow you to wipe away any excess disinfectant solution or saliva during the tightening process. It will help to keep the area clean and dry.
By gathering all of these necessary tools, you will be well-prepared to tighten your palate expander effectively and safely.
Cleaning the Palate Expander
1. Gather the necessary tools: You will need a toothbrush with soft bristles, toothpaste, and a cup of warm water.
2. Rinse the palate expander: Start by rinsing the palate expander with warm water to remove any loose particles or food debris.
3. Apply toothpaste: Squeeze a pea-sized amount of toothpaste onto the toothbrush bristles.
4. Brush the palate expander: Gently brush the palate expander using circular motions, making sure to reach all the surfaces and crevices. Pay extra attention to the areas where the expander attaches to the teeth.
5. Rinse thoroughly: Rinse the palate expander with warm water to remove any remaining toothpaste residue.
6. Inspect for cleanliness: Check the palate expander to ensure that it is clean and free from any debris or plaque. If necessary, repeat the cleaning process.
7. Clean the key: If your palate expander has a key, make sure to clean it as well. Use warm water and a toothbrush to gently brush the key, removing any dirt or bacteria.
8. Store properly: After cleaning, store the palate expander in a clean and dry container to prevent any contamination.
By regularly cleaning your palate expander, you can maintain good oral hygiene and ensure the effectiveness of the treatment. It is also recommended to consult with your orthodontist for specific cleaning instructions and to schedule regular check-ups to monitor the progress of your treatment.
Checking for Any Loose Parts
To check for loose parts, carefully examine the palate expander. Look for any screws, wires, or other components that may be loose or out of place. Use a mirror and a flashlight if necessary to get a better view of all areas of the expander.
If you are unsure about whether a part is loose or not, it is best to consult with an orthodontist or dental professional. They will be able to provide guidance and assistance in determining if any repairs or adjustments are needed.
Checking for any loose parts is a crucial step in the process of tightening a palate expander. By ensuring that all components are secure and in proper working order, you can help ensure that the expander will function effectively and achieve the desired results.
Positioning the Key
Step 1: Wash your hands
Start by washing your hands thoroughly with soap and water. This will help prevent any bacteria or germs from entering your mouth and causing an infection.
Step 2: Locate the key
Find the key that was provided to you by your orthodontist. It is a small metal tool with a square or hexagonal shape, specifically designed to fit into the expander’s screw mechanism.
Step 3: Position yourself in front of a mirror
Stand in front of a mirror so that you can clearly see your palate expander and have a better view of the key and your mouth.
Step 4: Open your mouth wide
Gently open your mouth wide, making sure to keep your lips away from the expander. This will provide better access to the screw mechanism and make it easier to insert the key.
Step 5: Locate the screw mechanism
Look at the palate expander and locate the screw mechanism. It is usually located in the middle of the expander, between the two halves. The screw mechanism is where you will insert the key.
Step 6: Hold the key correctly
Hold the key with the square or hexagonal end facing up. This end is the one that will fit into the screw mechanism. Make sure you have a firm grip on the key to prevent it from slipping and causing any injuries.
Step 7: Insert the key into the expander
Insert the square or hexagonal end of the key into the screw mechanism of the palate expander. Make sure it fits securely and is inserted all the way in.
Step 8: Align the key
Once the key is inserted, align it vertically with the expander. This will ensure that you turn the key in the correct direction and apply the right amount of pressure.
Step 9: Prepare to turn the key
Get ready to turn the key by placing your thumb and index finger on the key’s handle. Make sure you have a firm grip and are ready to apply the necessary pressure.
Step 10: Proceed with caution
Start turning the key slowly and gently in a clockwise direction. Be careful not to apply too much pressure at once, as this can cause discomfort or damage to the expander.
By following these steps and positioning the key correctly, you will be able to tighten your palate expander effectively and safely. Remember to consult with your orthodontist if you have any concerns or questions throughout the process.
Inserting the Key into the Expander
Once you have positioned the key properly, it is time to insert it into the expander. This step is crucial as it allows you to activate the expander and start the process of widening your palate. Follow the steps below to ensure you insert the key correctly:
Step 1: Hold the key with a firm grip
Before inserting the key, make sure you have a firm grip on it. This will prevent any accidental slipping or dropping of the key during the process.
Step 2: Locate the hole on the expander
Take a moment to locate the hole on the expander where the key needs to be inserted. This hole is usually located at the center of the expander, and it may be covered by a small cap or cover.
Step 3: Align the key with the hole
Align the key with the hole on the expander. Make sure the key is positioned correctly and is parallel to the hole. This will ensure smooth insertion and prevent any damage to the expander.
Step 4: Gently insert the key
With a steady hand, gently insert the key into the hole on the expander. Apply light pressure and be careful not to force the key. If you encounter any resistance, stop and double-check the alignment.
Step 5: Push the key all the way in
Continue pushing the key into the hole until it is fully inserted. Ensure that the key is securely in place and does not wobble or move around. This will ensure proper activation of the expander.
By following these steps, you can successfully insert the key into the expander and proceed with the tightening process. Remember to be gentle and cautious to avoid any unnecessary complications or discomfort.
Turning the Key Clockwise
Once you have positioned the key correctly in the expander, it is time to start turning it clockwise. This step is crucial as it activates the expander and applies pressure to the palate.
Using a gentle yet firm grip, slowly turn the key in the direction indicated by your orthodontist. Make sure to apply steady pressure and avoid any sudden or jerky movements.
As you turn the key, you may feel some resistance, which is normal. However, if you experience any severe pain or discomfort, stop immediately and consult your orthodontist.
Continue turning the key until you reach the desired level of activation. Your orthodontist will provide specific instructions on how many turns to make and how often to tighten the expander.
Remember to keep track of the number of turns you make each time to ensure consistent progress. This will help your orthodontist monitor your treatment and make any necessary adjustments along the way.
Tips for Turning the Key Clockwise:
1. Take your time and be patient. Rushing the process can lead to mistakes or unnecessary discomfort.
2. Use a mirror to help you see the key and expander more clearly.
3. If you are having trouble turning the key, try using a small cloth or tissue for a better grip.
4. Avoid eating hard or sticky foods immediately after tightening the expander to prevent damage.
5. If you have any questions or concerns, don’t hesitate to reach out to your orthodontist for guidance.
By following these steps and tips, you can successfully turn the key clockwise and apply the right amount of pressure to your palate expander. Remember, consistency is key in achieving the desired results, so make sure to schedule regular tightening appointments as recommended by your orthodontist.
Applying the Right Amount of Pressure
Remember, the goal is to apply enough pressure to activate the expander without causing excessive pain or discomfort. If you are unsure about how much pressure to apply, it is always best to consult your orthodontist for guidance.
Tips for Applying the Right Amount of Pressure:
- Start with a gentle and slow turn of the key.
- Pay attention to any discomfort or pain and adjust accordingly.
- Avoid applying sudden or jerky movements.
- If in doubt, consult your orthodontist for guidance.
By applying the right amount of pressure during the tightening process, you can ensure that your palate expander is working effectively and achieving the desired results. Remember to follow the instructions provided by your orthodontist and schedule regular tightening appointments to monitor the progress of your treatment.
Listening for the Clicking Sound
One of the most important steps in tightening a palate expander is listening for the clicking sound. This sound indicates that the expander has been properly activated and that the desired amount of expansion has been achieved.
When you insert the key into the expander and turn it clockwise, you will feel some resistance. As you continue to turn the key, you should listen carefully for a clicking sound. This clicking sound signifies that the expander has reached its maximum expansion and that you can stop turning the key.
It is crucial to pay close attention to this clicking sound as over-tightening the expander can cause discomfort and even damage to the palate. On the other hand, under-tightening may not provide the desired results and may prolong the treatment process.
Remember, listening for the clicking sound is an essential part of the tightening process. By paying attention to this sound, you can ensure that your palate expander is working effectively and that your orthodontic treatment is progressing as planned.
Removing the Key
Step 1: Positioning
Start by positioning yourself in front of a mirror and locate the key. Make sure that you have a clear view of the expander and your mouth.
Step 2: Grip the Key
Gently grip the key between your thumb and index finger. Ensure that you have a firm grip to prevent any slipping or dropping of the key.
Step 3: Insertion
Insert the key into the hole of the expander. Be careful not to apply any pressure or turn the key at this point.
Step 4: Turning
Now, turn the key counterclockwise until you feel resistance. This will unlock the expander and allow you to remove it easily.
Step 5: Removal
Gently pull the key out of the hole, making sure to keep it steady and straight. Avoid any sudden movements or jerking motions.
Step 6: Rinse
After removing the key, rinse it thoroughly with warm water to ensure cleanliness. This will help prevent any bacteria or debris from accumulating on the key.
By following these steps, you can safely and effectively remove the key from your palate expander. Remember to always be gentle and cautious to avoid any damage or discomfort. If you have any concerns or difficulties, it is recommended to consult with your orthodontist for further guidance.
Checking for Proper Activation
By regularly checking for proper activation, you can ensure that your palate expander is working effectively and that you are on track to achieve the desired results. Remember to follow your orthodontist’s instructions and attend all scheduled tightening appointments to ensure the best outcome for your treatment.
Rinsing the Mouth
Start by filling a cup or glass with warm water. Take a small sip of water and swish it around in your mouth for about 30 seconds. Make sure to swish the water around all areas of your mouth, including the front, back, and sides.
After swishing the water around, spit it out into a sink or a cup. Repeat this process several times until the water you spit out is clear and free of any debris.
It is also recommended to use a mouthwash or saltwater rinse after rinsing with water. Mouthwash helps to kill any bacteria that may be present in the mouth, while saltwater rinse helps to reduce inflammation and promote healing.
To use mouthwash, pour a small amount into a cup and swish it around in your mouth for about 30 seconds. Spit it out and rinse your mouth with water afterwards. If using a saltwater rinse, dissolve half a teaspoon of salt in a cup of warm water and swish it around in your mouth for about 30 seconds. Spit it out and rinse your mouth with water afterwards.
Remember to rinse your mouth after every meal and before bed to maintain good oral hygiene. This will help to prevent any complications and promote the success of the palate expander treatment.
Important Note: If you experience any pain or discomfort during or after rinsing, contact your orthodontist immediately for further guidance.
Monitoring the Progress
1. Visual Inspection
One way to monitor the progress is through visual inspection. Take a close look at the teeth and the palate to see if there are any noticeable changes. Look for gaps between the teeth, any shifts in alignment, or changes in the shape of the palate. Document any observations for future reference.
2. Bite Analysis
Analyze the patient’s bite to determine if there have been any improvements. Check for proper alignment of the upper and lower teeth when the patient bites down. Look for any changes in the way the teeth fit together, such as a more even bite or a better occlusion. Note any changes in the bite pattern.
3. X-rays
X-rays can provide a more detailed view of the progress. They can show changes in the position of the teeth and the expansion of the palate that may not be visible to the naked eye. X-rays can help determine if the treatment is on track and if any adjustments need to be made.
4. Communication with the Orthodontist
Regular communication with the orthodontist is essential for monitoring the progress. Schedule follow-up appointments to discuss any concerns or questions. The orthodontist can evaluate the progress based on the visual inspection, bite analysis, and x-rays. They can make any necessary adjustments to the treatment plan to ensure optimal results.
By monitoring the progress of the palate expander treatment, you can ensure that the desired changes are occurring and make any necessary adjustments along the way. Regular check-ups and communication with the orthodontist are key to a successful treatment outcome.
Scheduling the Next Tightening Appointment
During the next tightening appointment, the orthodontist will evaluate the progress of the palate expander and make any necessary adjustments. This step is crucial in ensuring that the expander is working effectively and achieving the desired results.
When scheduling the next tightening appointment, it is advisable to consider any upcoming events or commitments that may affect availability. It is best to choose a date and time that allows for a comfortable and convenient visit to the orthodontist’s office.
Before leaving the current appointment, be sure to confirm the date and time of the next visit. This will help in planning and ensure that there are no conflicts or scheduling issues.
Remember to maintain good oral hygiene and continue with the recommended care routine between appointments. This includes regular brushing, flossing, and rinsing with mouthwash. Proper oral care will contribute to the success of the orthodontic treatment.
By staying on schedule and following the orthodontist’s recommendations, the tightening appointments will progress smoothly, and the desired results will be achieved in a timely manner. Patience and cooperation are key during the entire treatment process.
So, make sure to schedule the next tightening appointment and continue on the journey towards a healthier and more aligned smile!

Dr. Fidel Cann: Esteemed orthodontist with a lifelong dedication to enhancing smiles and oral health. Pioneering expertise, compassionate care.